
# Related Techniques and Patterns
This eBook is intended to give you a quick-start, practical overview of the microservices approach. I believe, once interested in the topic, you can find additional sources to dig into. In this chapter I would like to mention just a few programming techniques and design patterns which have become popular with microservices gaining the spotlight. We want to cover the full scope of building microservices and tools that can be particularly useful to that goal.
# Fundamentals of distributed systems
Microservices architecture assumes the high distribution of our services. That introduces new categories of issues that may not even exist with monolithic approaches. There are two major theories that should be understood before diving deep into this new architecture.
# CAP theorem
Also called "Brewer theorem" after Eric Brewer, states that, for distributed systems it’s not possible to provide more than two of the following three guarantees:
Consistency - every read receives the most recent data or error.
Availability - every request receives a (non-error) response BUT without a guarantee of most-recent data.
Partition tolerance - interpreted as a system able to work despite the number of dropped messages between cluster nodes.
In other words - when it comes to communication issues (partition of the cluster), you must choose between consistency or availability. This is strongly connected with techniques of high availability like caching and data redundancy (eg. database replication).
When the system is running normally - both availability and consistency can be provided. In case of failure, you get two choices:
Raise an error (and break the availability promise) because it’s not guaranteed that all data replicas are updated.
Provide the user with cached data (due to the very same reason as above).
Traditional database systems (compliant with ACID (NOTE: https://en.wikipedia.org/wiki/ACID)) prefer consistency over availability.
# Eventual consistency
It’s not a programming technique but rather something you have to think about when designing distributed systems. This consistency model is connected directly to the CAP theorem and informally guarantees that if no new updates are made to a given data item, eventually all access to that item will return the last updated value.
Eventually consistent services are often classified as providing BASE (Basically Available, Soft state, Eventual consistency) semantics, in contrast to traditional ACID guarantees.
To achieve eventual consistency, the distributed system must resolve data conflicts between multiple copies of replicated data. This usually consists of two parts:
Exchanging updates between servers in a cluster.
Choosing the final state.
The widespread model for choosing the final state is "last writer wins" - achieved by including an update timestamp along with an updated copy of data.
# Design patterns
Having knowledge of the core theories that underpin the issues which we may encounter when developing and designing a distributed architecture, we can now go into higher-level concepts and patterns. Design patterns are techniques that allow us to compose code of our microservices in a more structured way and facilitate further maintenance and development of our platform.
# CQRS
CQRS means Command-Query Responsibility Segregation. The core idea behind CQRS is the extension of the CQS concept by Bertrand Meyer, where objects have two types of methods. Command methods perform actions in systems and always return nothing, query methods return values and they have no effect on the system.
In CQRS, write requests (aka commands) and read requests (aka queries) are separated into different models. The write model will accept commands and perform actions on the data, the read model will accept queries and return data to the application UI. The read model should be updated if, and only if, the write model was changed. Moreover, single changes in the write model may cause updates in more than one read model. What is very interesting is that there is a possibility to split data storage layers, set up a dedicated data store for writes and reads, and modify and scale them independently.
For example, all write requests in the e-Commerce application, like adding a new order or product reviews, can be stored in a typical SQL database but some read requests, like finding similar products, can be delegated by the read model to a graph engine.
General flow in CQRS application:
Application creates a command as a result of user action.
Command is processed, write model saves changes in data store.
Read model is updated based on changes in write model.
Pros:
Better scalability and performance.
Simple queries and commands.
Possibility to use different data storage and theirs functionalities.
Works well in complex domains.
Cons:
Increased complexity of the entire system.
Eventually consistent, read model may be out of sync with write model for a while.
Possible data and code duplication.
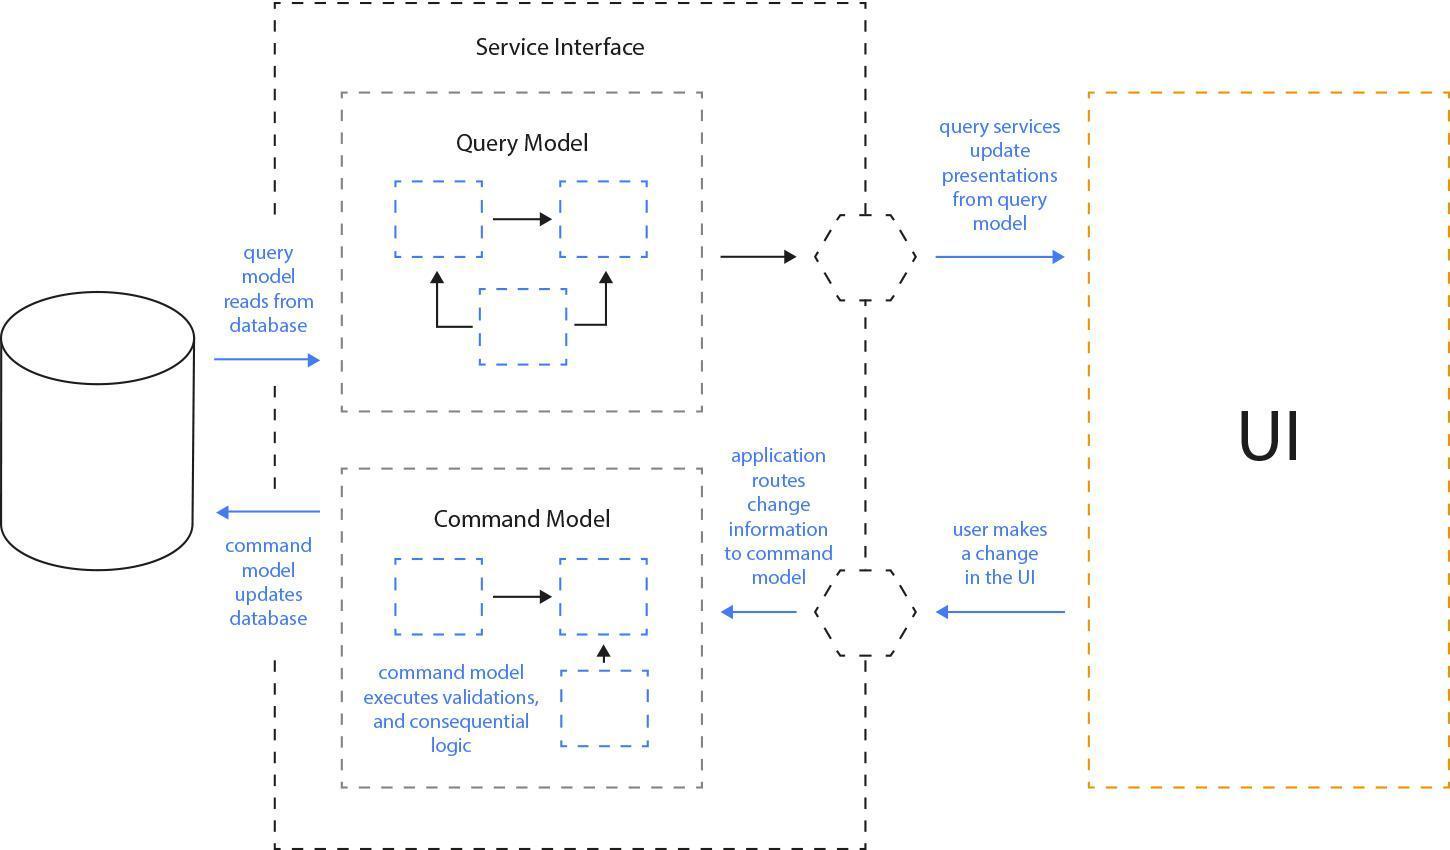
Fig. 9: CQRS architecture (https://martinfowler.com/bliki/images/cqrs/cqrs.png).
# Event Sourcing
Data stores are often designed to directly keep the actual state of the system without storing the history of all the submitted changes. In some situations this can cause problems. For example, if there is a need to prepare a new read model for some specific point of time (like your current address on an invoice from 3 months ago - which may have changed in the meantime - and you haven’t stored the time-stamped data snapshots, it will be a big deal to reprint or modify the correct document).
Event Sourcing stores all changes as a time-ordered sequence of events; each event is an object that represents a domain action from the past. All events published by the application object persist inside a dedicated, append-only data store called Event Store. This is not just an audit-log for the whole system because the main role of Event Store is to reconstruct application objects based on the history of the related events.
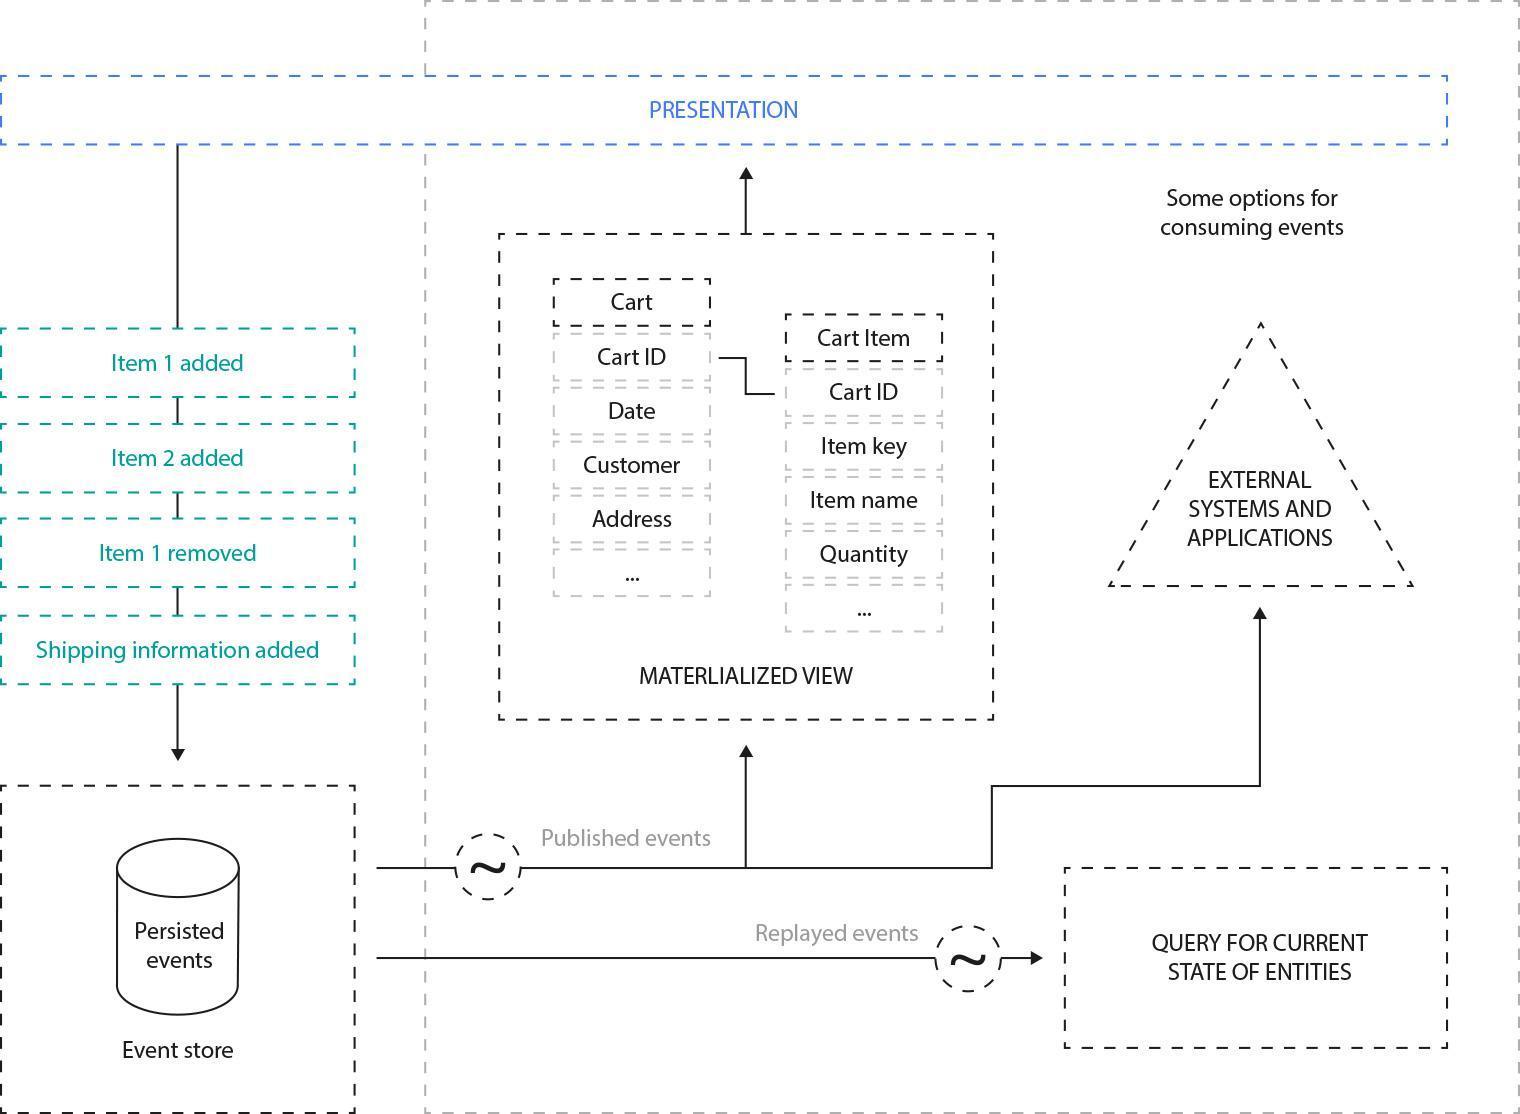
Fig. 10: Event Sourcing overview (https://docs.microsoft.com/en-us/azure/architecture/patterns/_images/event-sourcing-overview.png)
Consider the following sequence of domain events, regarding each Order lifecycle:
OrderCreatedOrderApprovedOrderPaidOrderPreparedOrderShippedOrderDelivered
During the recreation phase, all events are fetched from the EventStore and applied to a newly constructed entity. Each applied event changes the internal state of the entity.
The benefits of this approach are obvious. Each event represents an action, which is even better if DDD is used in the project. There is a trace of every single change in domain entities.
But there are also some potential drawbacks here… How can we get the current states of tens of objects? How fast will object recreation be if the events list contains thousands of items?
Fortunately, the Event Sourcing technique has prepared solutions to these problems. Based on the events, the application can update one or more from materialized views, so there is no need to fetch all objects from the event history to get their current states.
If the event history of the entity is long, the application may also create some snapshots. By "snapshot", I mean the state of the entity after every n-th event. The recreation phase will be much faster because there is no need to fetch all the changes from the Event Store, just the latest snapshot and further events.
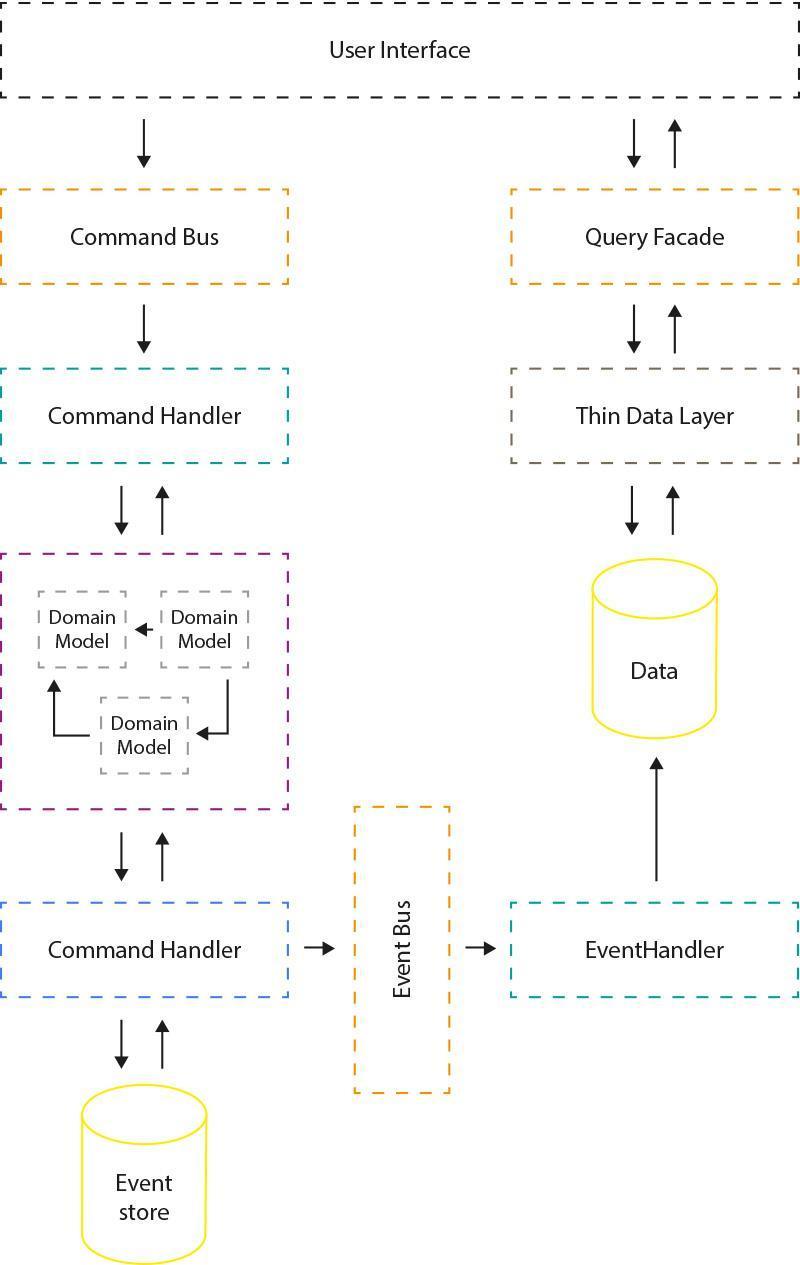
Fig. 11: Event Sourcing with CQRS (https://pablocastilla.files.wordpress.com/2014/09/cqrs.png?w=640).
Event Sourcing works very well with CQRS and Event Storming, a technique for domain event identification by Alberto Brandolini. Events found with domain experts will be published by entities inside the write model. They will be transferred to a synchronous or asynchronous event bus and processed by event handlers. In this scenario, event handlers will be responsible for updating one or more read models.
Pros:
Perfect for modeling complex domains...
Possibility to replay all stored events and build new read models.
Reliable audit-log for free.
Cons:
Queries implemented with CQRS.
Eventually consistent model.
# Event-driven data management
Microservices should be coupled as loosely as possible, It should be possible to develop, test, deploy and scale them independently. Sometimes an application should even be able to work without particular services (to comply with HA - high availability)… To achieve these requirements, each microservice should have a separate data store. Sounds easy - but what about the data itself? How to spread the information changes between services? What about consistency within the data?
One of the best solutions is simply using events. If anything important happened inside a microservice, a specific event is published to the message broker. Other microservices may connect to the message broker, receive, and consume a dedicated copy of that message. Consumers may also decide which part of the data should be duplicated to their local store.
Safe publishing of events from the microservice is quite complicated. Events must be published to the message broker if, and only if, data stored in a data store has changed. Other scenarios may lead to huge consistency problems. Usually it means that data and events should persist inside the same transaction to a single data store and then propagate to the rest of the system.
Switching from theory to a practical point of view, it’s quite a common case to use RabbitMQ as a message broker. RabbitMQ is a very fast and efficient queue server written in Erlang with wide set of client libraries for the most popular programming languages. A popular alternative to RabbitMQ is Apache Kafka, especially for bigger setups or when event stream mining and analytics is critical.
Spreading data across multiple separated data stores and achieving consistency using events can cause some problems. For example, there is no easy way to execute a distributed transaction on different databases. Moreover, there can also be consistency issues because when events are inside the message broker, somewhere between microservices, the state of the whole system is inconsistent. The data store behind the original microservice is updated but changes aren’t applied on data stores behind other microservices. This model, called Eventually Consistent, is a disadvantage and an advantage the same time. Data will be synchronized in the future but you can also stop some services and you will never lose your data. They will be processed when services are restored.
In some situations, when a new microservice is introduced, there is a need to seed the database. If there is a chance to use data directly from different „sources of truth", it’s probably the best way to setup a new service. But other microservices may also expose feeds of theirs events, for example in the form of ATOM feeds. New microservices may process them in chronological order, to compile the final state of new data stores. Of course, in this scenario each microservice should keep a history of all events, which can sometimes be a subsequent challenge.
# Integration techniques
System integration is key to developing efficient microservices architecture. Services must talk to each other in a consistent way. The overall structure of a platform could be easily discoverable by hiding all of the dependencies behind facades like a common API gateway.
Moreover, all of that communication should use authentication mechanisms as microservices are commonly exposed to the outside world. They should not be designed with the intention of residing only in our firewall-protected network. We show two possible ways of making our integration secure by using token based techniques such as OAuth2 and JWT.
# API Gateways
With the microservices approach, it’s quite easy to make internal network communication very talkative. Nowadays, when 10G network connections are standard in data-centers, there may be nothing wrong with that. But when it comes to communication between your mobile app and backend services, you might want to compress as much information as possible into one request.
The second reason to criticise microservices might be a challenge with additional sub-service calls like authorization, filtering etc.
To overcome the mentioned obstacles, we can use the API Gateway approach. It means you can compile several microservices using one facade. It combines multiple responses from internal sub-services into a single response. With almost no business logic included, gateways are an easy and safe choice to optimize communication between frontend and backend or between different backend systems.
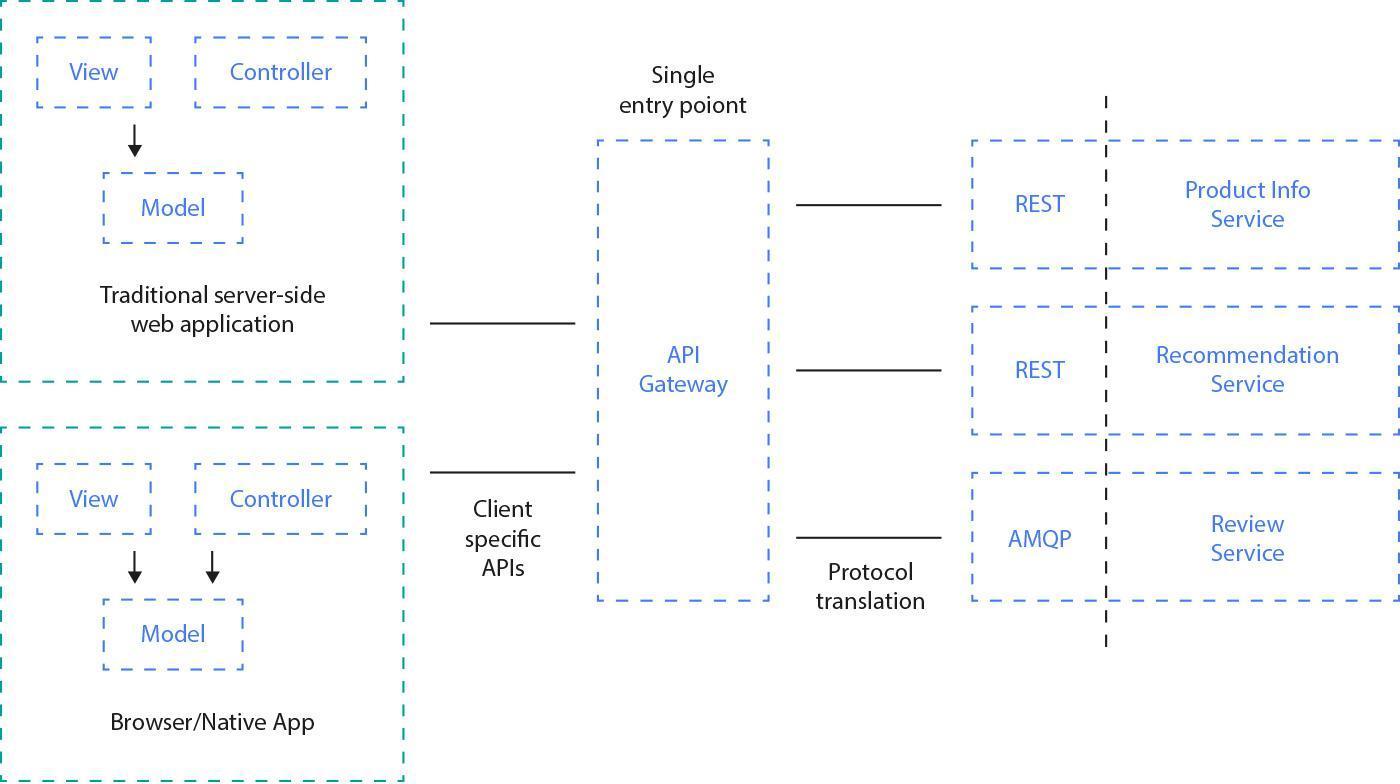
Fig. 12: Using an API gateway you can compose your sub-service calls into easy to understand and easy to use facades. Traffic optimization, caching and authorization are additional benefits of such an approach.
The API Gateway - which is an implementation of classic Proxy patterns - can provide a caching mechanism as well (even using a vanilla-Varnish cache layer without additional development effort). With this feature alone, using cloud approaches (like Amazon solutions), can scale API and services very easily.
Additionally, you can provide common authorization layers for all services behind the gateway. For example - that’s how Amazon API Gateway Service (NOTE: https://aws.amazon.com/api-gateway/) + Amazon Cogito (NOTE: http://docs.aws.amazon.com/cognito/latest/developerguide/authentication-flow.html) work.
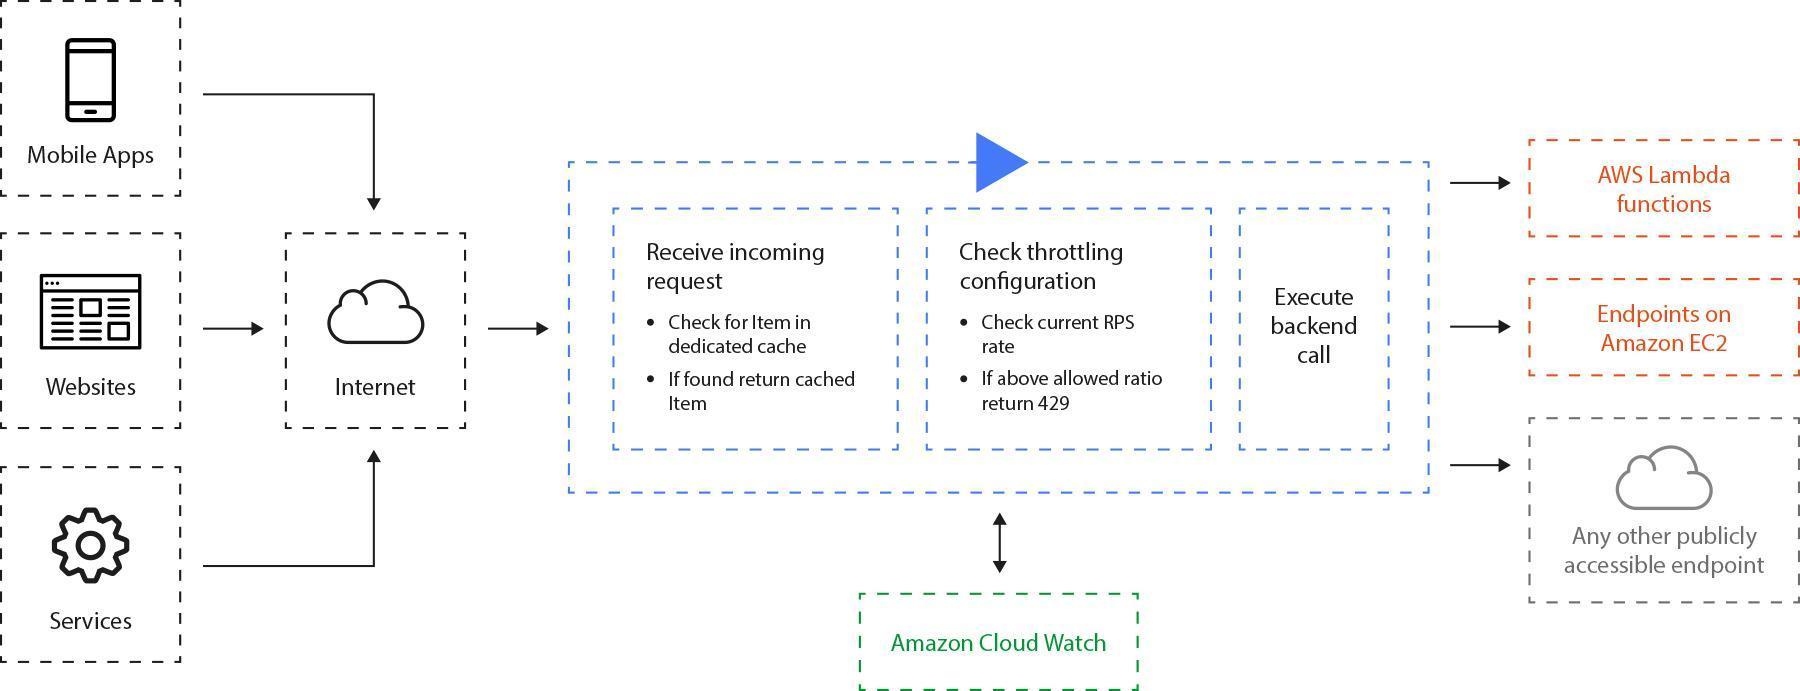
Fig. 13: Amazon API Gateway request workflow **https://aws.amazon.com/api-gateway/details*/). Amazon gateway supports caching and authorization features in spite of your web-service internals.*
Swagger (NOTE: https://swaggerhub.com/blog/swaggerhub-feature/swagger-amazon-api-gateway-and-lambda/) can help you, once a Gateway has been built, with direct integration and support to Amazon services.
# Backend for Frontends
A typical example of an API Gateway is the backend for frontends (BFF) pattern. It is about facades and compiling several microservices into optimized / device or channel-oriented API services. Its microservice design pattern was proposed by Sam Newman of Thought Works (author of "Building Microservices"): to create single purpose edge APIs for frontends and other parties.
Creating such a facade-API brings at least two benefits to your application:
If you manage to have some micro services behind your facade, you can avoid network latency - which is especially important on mobile devices. Using a facade, you can hide all network traffic between services executing the sub-calls in internal networks from the end-client.
Then you can optimize your calls to be more compliant with a specific domain model. You can model the API structures by merging and distributing subsequent service calls instead of pushing this logic to the API client’s code.
The diagram below shows a migration from General Purpose API to a dedicated backends for frontends approach which integrates the sub-services into logic.
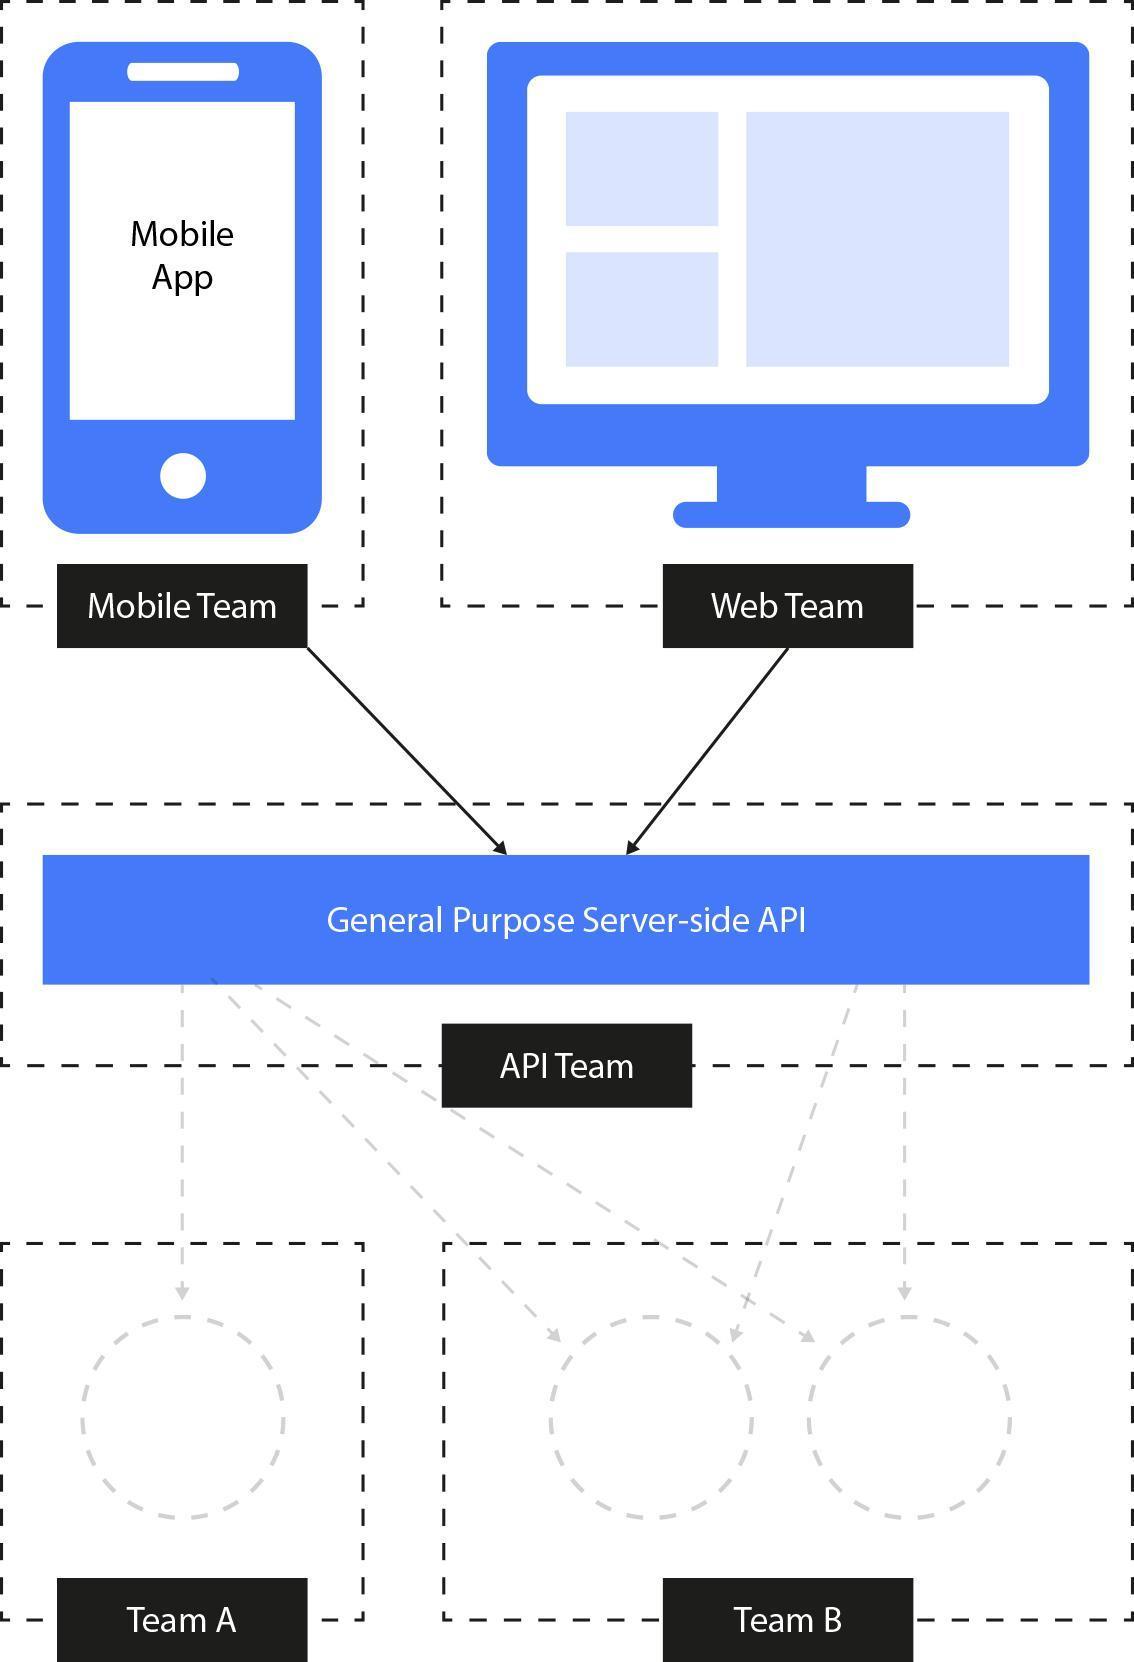

Fig. 14: Backend for frontends architecture is about minimizing the number of backend calls and optimizing the interfaces to a supported device.
There are many approaches to separate backend for frontends and roughly speaking it always depends on the differences in data required by a specific frontend, or usage-patterns behind specific API clients. One can imagine a separate API for frontend, mobile apps - as well as separate interfaces for iOS and Android if there are any differences between these applications regarding how service calls are made or their respective data formats.
One of the concerns of having a single BFF per user interface is that you can end up with lots of code duplication between the BFFs themselves.
Pete Hodgson (ex. Thought Works) suggests that BFFs work best when organized around teams. The team structure should drive how many BFFs you have. This is a pragmatic approach to not over-engineer your system but rather have one mobile API if you have one mobile team etc.
It’s then a common pattern to separate shared algorithms, models and code to separate the shared service or library used by frontend-related facades. Creating such duplications can be avoided.
Let me quote a conclusion on BFF presented by Sam Newman himself:
Backends For Frontends solve a pressing concern for mobile development when using microservices. In addition, they provide a compelling alternative to the general-purpose API backend, and many teams make use of them for purposes other than just mobile development. The simple act of limiting the number of consumers they support makes them much easier to work with and change, and helps teams developing customer-facing applications retain more autonomy. (NOTE: http://samnewman.io/patterns/architectural/bff/)
# Token based authorization (oauth2, JWT)
Authorization is a key feature of any enterprise grade application. If you remember the beginnings of web 2.0 and Web API’s back then, a typical authorization scenario was based on an API key or HTTP authorization. With ease of use came some strings attached. Basically these "static" (API key) and not strongly encrypted (basic auth.) methods were not secure enough.
Here, delegated authorization methods come into action. By delegated, we mean that authorization can be given by an external system / identity provider. One of the first methods of providing such authentication was the OpenID standard (NOTE: http://openid.net/) developed around 2005. It could provide a One Login and Single Sign On for any user. Unfortunately, it wasn’t widely accepted by identification providers like Google, Facebook or e-mail providers.
The OAuth standard works pretty similarly to OpenID. The authorization provider allows Application Developers to register their own applications with the required data-scope to be obtained in the name of the user. The user authorizes specific applications to use with their account.
Facebook or Google Account login screens are a well known part of oauth authorization.
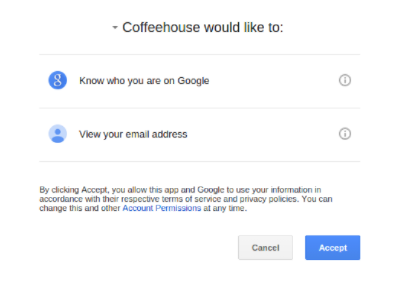
Fig. 15: Authorization screen for Google Accounts to authorize external application to use Google APIs in the name of the user.
After accepting the application request the authorising party returns a temporary Access Token which should be used with API calls to verify the user identity. The Internal Authorization server checks tokens with its own database of issued tokens - paired with user identities, ACLs, etc.
Authorization tokens are issued for a specific amount of time and should be invalidated afterwards. Token authorization is 100% stateless; you don’t have to use sessions (like with good, old session based authorization) (NOTE: http://stackoverflow.com/questions/7561631/oauth-2-0-benefits-and-use-cases-why). OAuth 2.0 requires SSL communication and avoids additional request-response signatures required by the previous version (requests were signed using HMAC algorithms); also, the workflow was simplified with 2.0 removing one additional HTTP request.
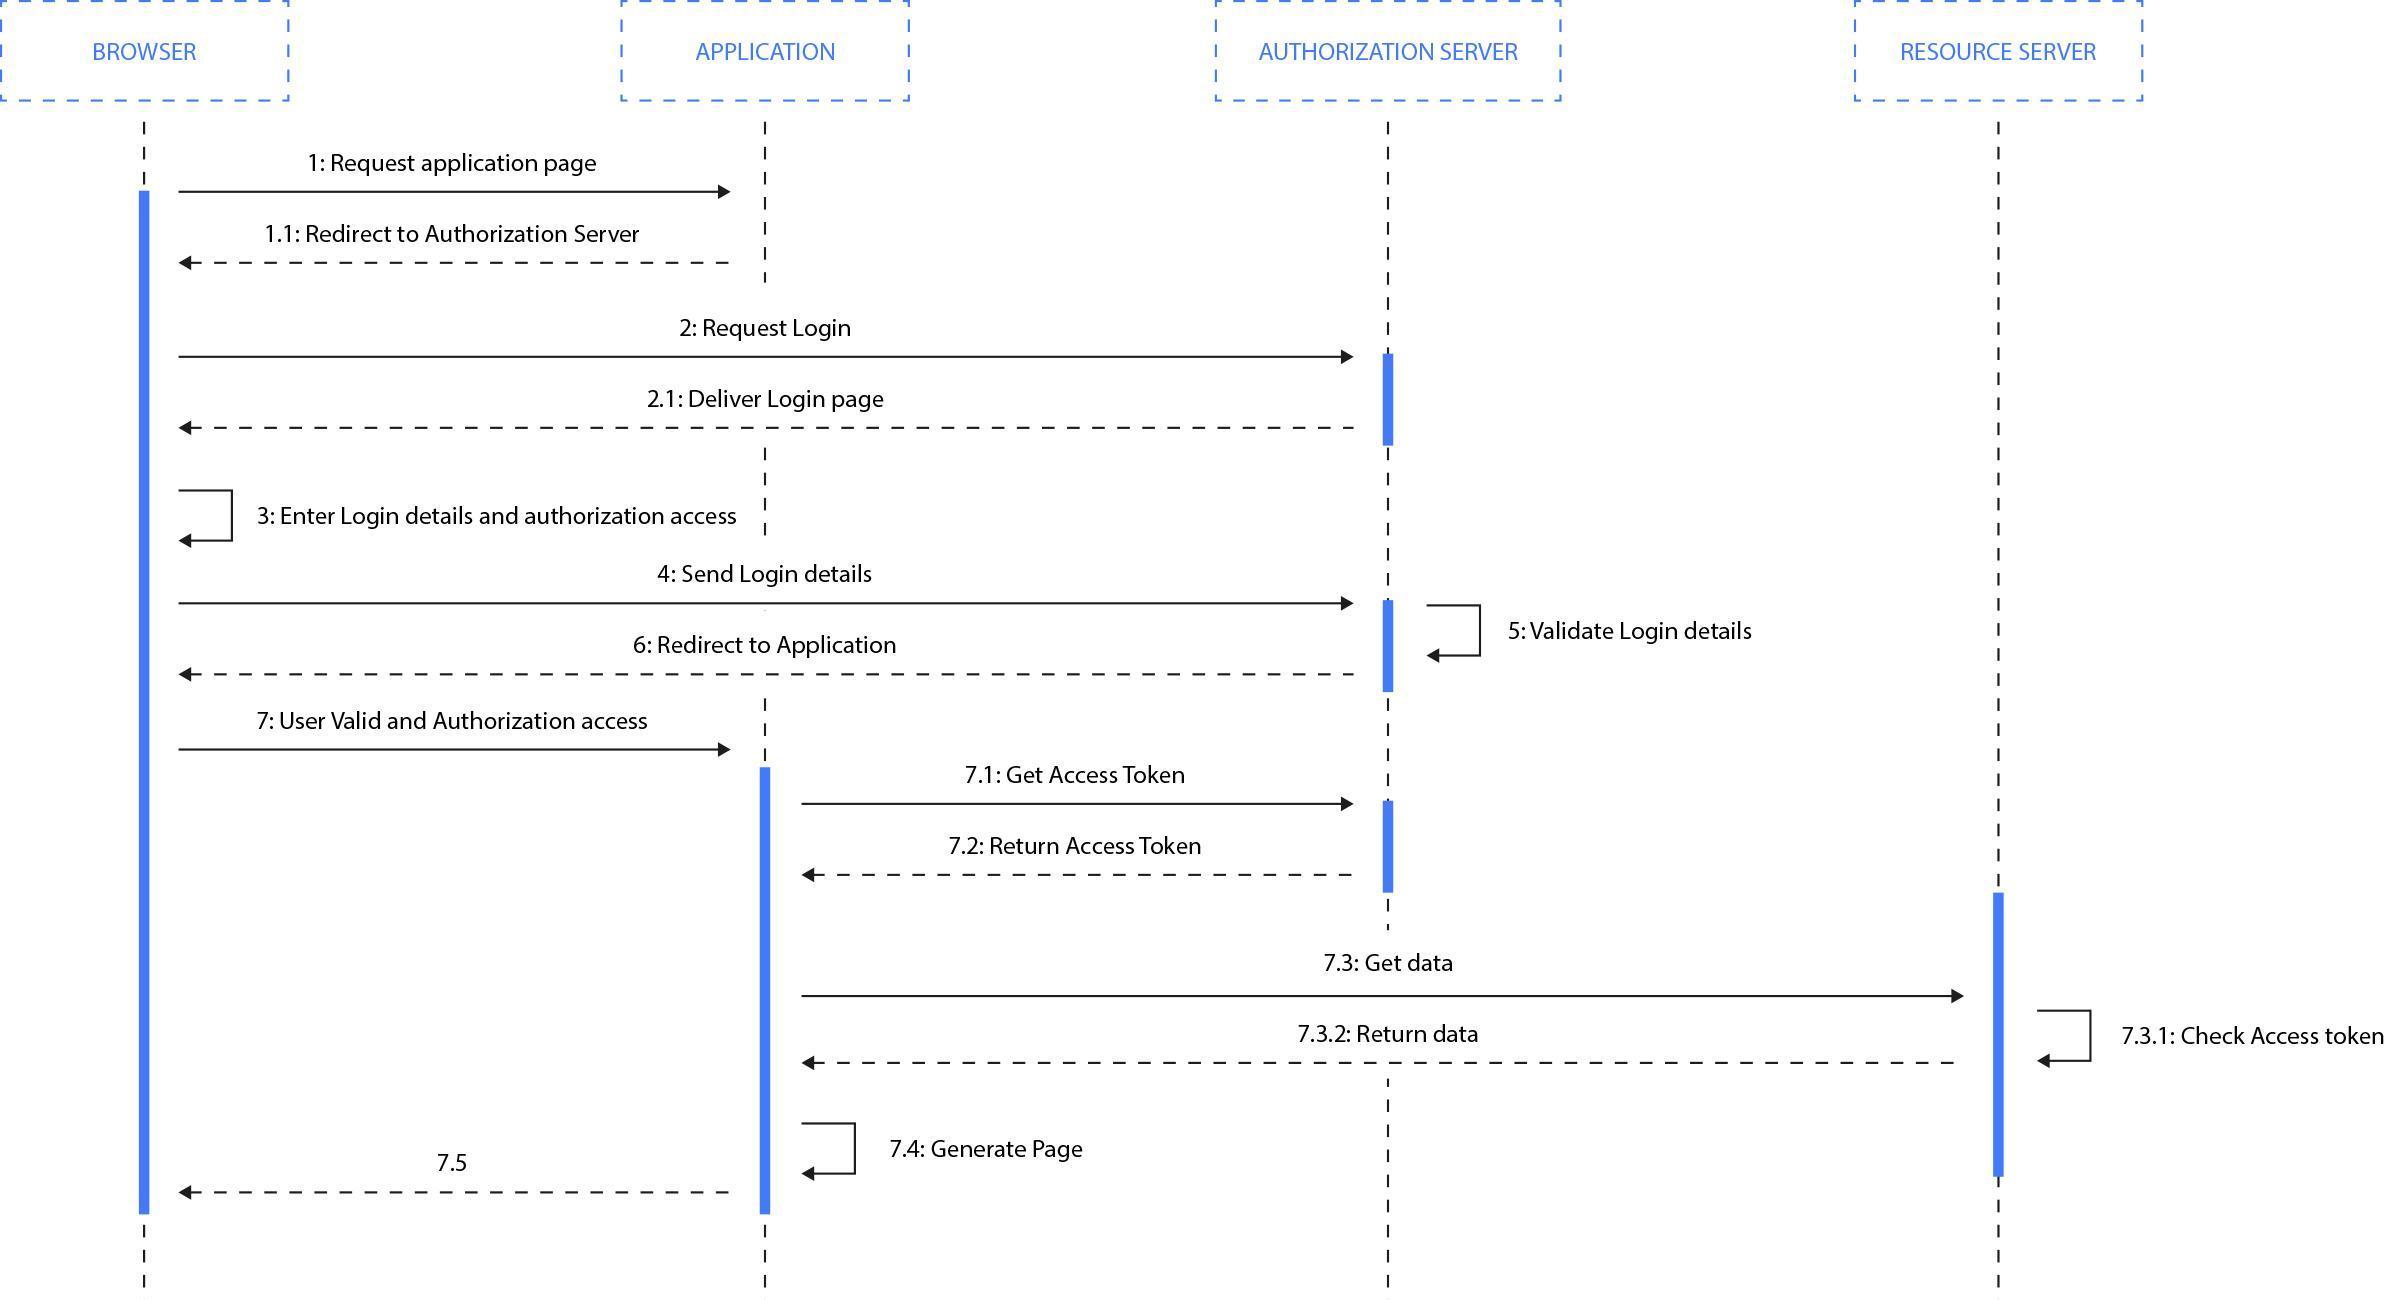
Fig. 16: Authorization flow for oauth2.
OAuth tokens don’t push you to display the authentication dialog each time a user requires access to their data. Following this path would make it impossible to check e-mail in the background or do any batch processing operations. So how to deal with such background-operations? You should use "offline" tokens (NOTE: https://auth0.com/docs/tokens/refresh-token) - which are given for longer time periods and can also be used to remember client credentials without requiring login/password each time the user hits your application.
There is usually no need to rewrite your own OAuth code as many open source libraries are available for most OAuth providers and frameworks. Just take a look on github!
There are SaaS solutions for identity and authorization, such as Amazon Cogito (NOTE: https://aws.amazon.com/cognito/) or Auth0 (NOTE: https://auth0.com/how-it-works) that can be easily used to outsource the authorization of your API’s.
# JSON Web Tokens (JWT)
Yet another approach to token based authorization is JWT (NOTE: https://jwt.io/) (JSON Web Tokens). They can be used for stateless claim exchange between parties. As OAuth tokens require validation by the authenticating party between all requests - JSON Web Tokens are designed to self-contain all information required and can be used without touching the database or any other data source.
JWT are self-contained which means that tokens contain all the information. They are encoded and signed up using HMAC.
This allows you to fully rely on data APIs that are stateless and even make requests to downstream services. It doesn't matter which domains are serving your APIs, so Cross-Origin Resource Sharing (CORS) won't be an issue as it doesn't use cookies. (NOTE: https://jwt.io/introduction/)
Validation of HMAC tokens (NOTE: https://en.wikipedia.org/wiki/Hash-based_message_authentication_code) requires the knowledge of the secret key used to generate the token. Typically the receiving service (your API) will need to contact the authentication server as that server is where the secret is being kept. (NOTE: https://jwt.io/introduction/)
Please take a look at the example.
Example token:
eyJhbGciOiJIUzI1NiIsInR5cCI6IkpXVCJ9.eyJzdWIiOiIxMjM0NTY3ODkwIiwibmFtZSI6IkpvaG4gRG9lIiwiYWRtaW4iOnRydWV9.TJVA95OrM7E2cBab30RMHrHDcEfxjoYZgeFONFh7HgQ
Contains following informations:
| Header (algorithm and token type) | { "alg": "HS256", "typ": "JWT" } |
| Payload (data) | { "sub": "1234567890", "name": "John Doe", "admin": true } |
| Signature | HMACSHA256( base64UrlEncode(header) + "." + base64UrlEncode(payload), ) secret base64 encoded |
JWT tokens are usually passed by the HTTP Bearer header, then stored client side using localStorage or any other resource. Tokens can be invalidated at that time (exp claim included into token).
Once returned from authorization, service tokens can be passed to all API calls and validated server side. Because of the HMAC based signing process, tokens are safe.
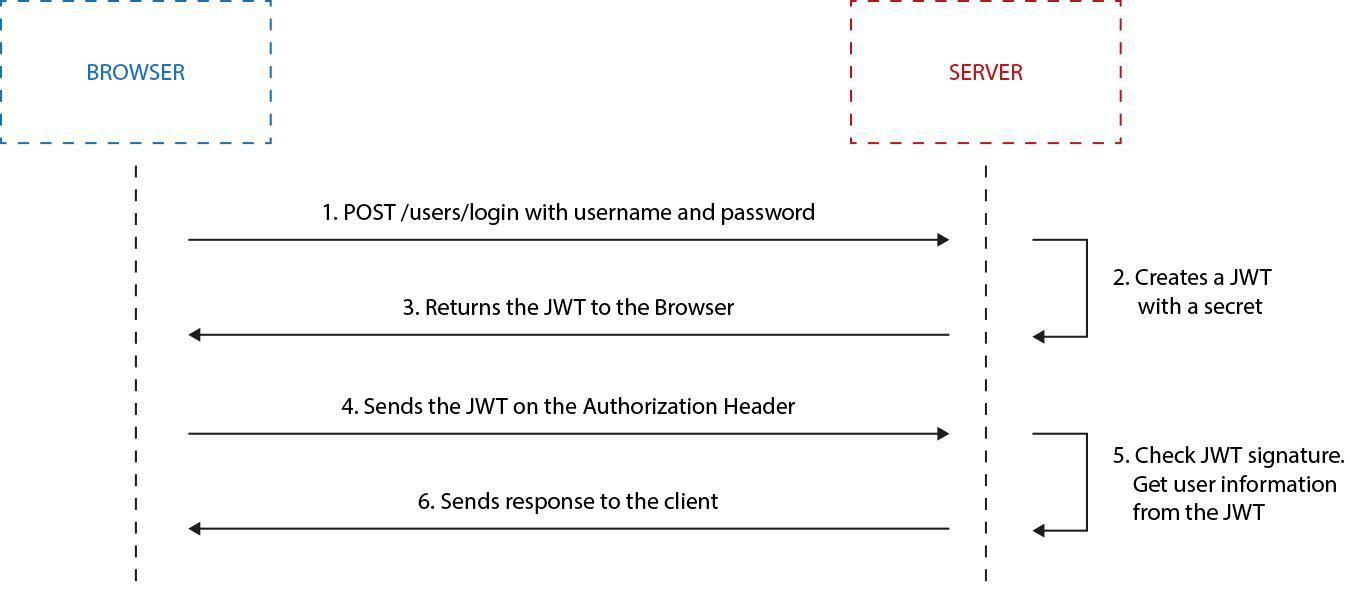
Fig. 17: JWT based authorization is pretty straight forward and it’s safe. Tokens can be trusted by authorized parties because of the HMAC signature; therefore information contained by them can be used without checking ACL’s and any further permissions.
# Deployment of microservices
If done wrong, microservices may come with an overhead of operational tasks needed for the deployments and maintenance. When dividing a monolithic platform into smaller pieces, each of them should be easy to deploy in an automatic way. Nowadays, we see two main concepts that facilitates such a process - containerization and serverless architecture.
# Docker and containerization
If you are not familiar with containerization, then here are the most common benefits that make it worth digging deeper into this concept:
Docker allows you to build an application once and then execute it in all your environments no matter what the differences between them.
Docker helps you to solve dependency and incompatibility issues.
Docker is like a virtual machine without the overhead.
Docker environments can be fully automated.
Docker is easy to deploy.
Docker allows for separation of duties.
Docker allows you to scale easily.
Docker has a huge community.
Let's start with a quote from the Docker page:
Docker containers wrap up a piece of software in a complete filesystem that contains everything it needs to run: code, runtime, system tools, system libraries – anything you can install on a server. This guarantees that it will always run the same, regardless of the environment it is running in.
This might sound familiar: virtualization allows you to achieve pretty much the same goals but in contrast to virtualization, Docker runs all processes directly on the host operating system. This helps to avoid the overhead of a virtual machine (both performance and maintenance).
Docker achieves this using the isolation features of the Linux kernel such as Cgroups and kernel namespaces. Each container has its own process space, filesystem and memory. You can run all kinds of Linux distributions inside a container. What makes Docker really useful is the community and all projects that complement the main functionality. There are multiple tools to automate common tasks, orchestrate and scale containerized systems. Docker is also heavily supported by many companies, just to name a couple: Amazon, Google, Microsoft. Currently, Docker also allows us to run Windows inside containers (only on Windows hosts).
# Docker basics
Before we dig into using Docker for the Microservices architecture let’s browse the top-level details of how it works.
Image - holds the file system and parameters needed to run an application. It does not have any state and it does not change. You can understand an image as a template used to run containers.
Container - this is a running instance of an image. You can run multiple instances of the same image. It has a state and can change.
Image layer - each image is built out of layers. Images are usually built by running commands or adding/modifying files (using a Dockerfile). Each step that is run in order to build an Image is an image layer. Docker saves each layer, so when you run a build next time, it is able to reuse the layers that did not change. Layers are shared between all images so if two images start with similar steps, the layers are shared between them. You can see this illustrated below.
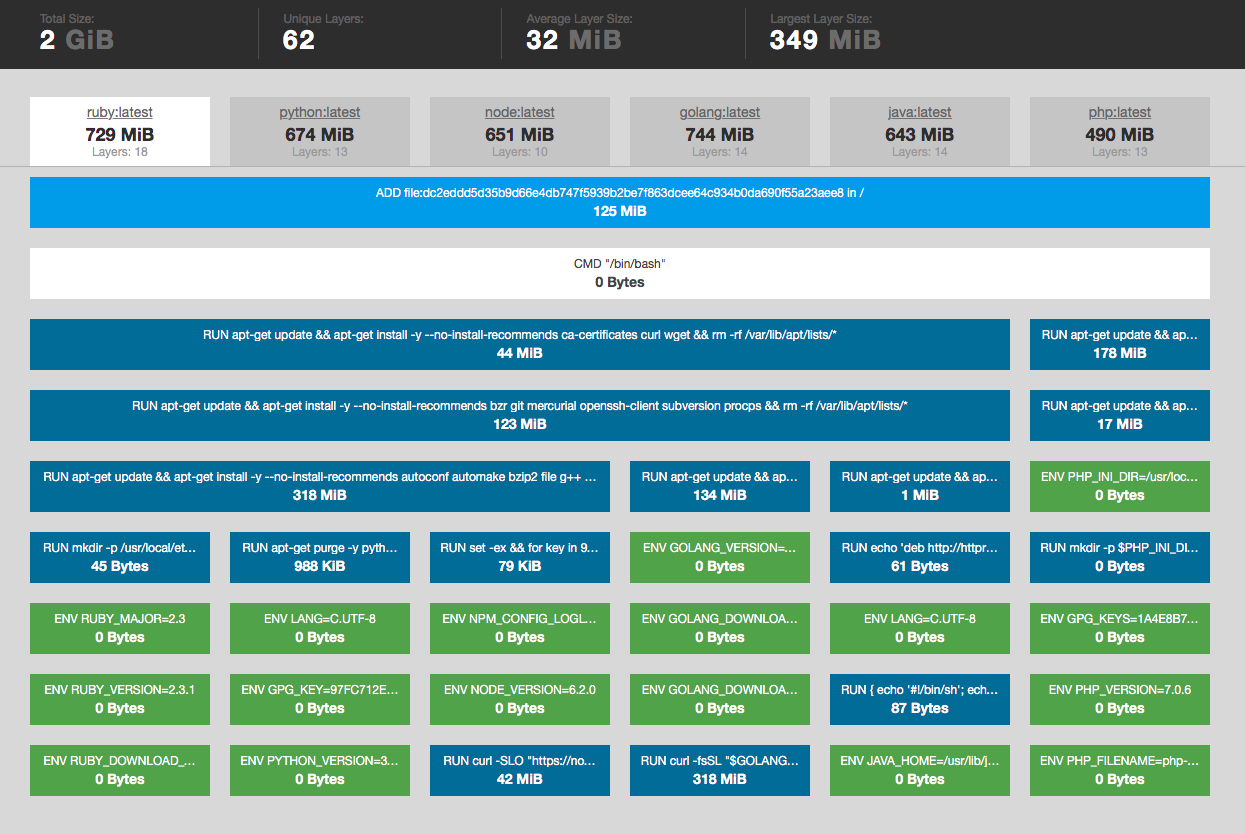
*Fig. 18: **You can use https://imagelayers.io*/ to analyze Docker image layers and compare them to each other. For example: ruby, python, node images share five layers - this means that if you download all three images the first 5 layers will be downloaded only once.
As you can see, all compared images share common layers. So if you download one of them, the shared layers will not be downloaded and stored again when downloading a different image. In fact, changes in a running container are also seen as an additional, uncommitted layer.
Registry - a place where images and image layers are kept. You can build an image on your CI server, push it to a registry and then use the image from all of your nodes without the need to build the images again.
Orchestration (docker-compose) - usually a system is built of several or more containers. This is because you should have only one concern per container. Orchestration allows you to run a multi-container application much easier and docker-compose is the most commonly used tool to achieve that. It has the ability to run multiple containers that can be connected with networks and share volumes.
# VM vs. Container
As mentioned earlier, Docker might seem similar to virtual machines but works in an entirely different way.
Virtual machines work exactly as the name suggests: by creating a virtualized machine that the guest system is using. The main part is a Hypervisor running on the host system and granting access to all kinds of resources for the guest systems. On top of the Hypervisor, there are Guest OS’s running on each virtual machine. Your application is using this Guest OS.
What Docker does differently is directly using the host system (no need for Hypervisor and Guest OS), it runs the containers using several features of the Linux kernel that allow them to securely separate the processes inside them. Thanks to this, a process inside the container cannot influence processes outside of it. This approach makes Docker more lightweight both in terms of CPU/Memory usage, and disk space usage.
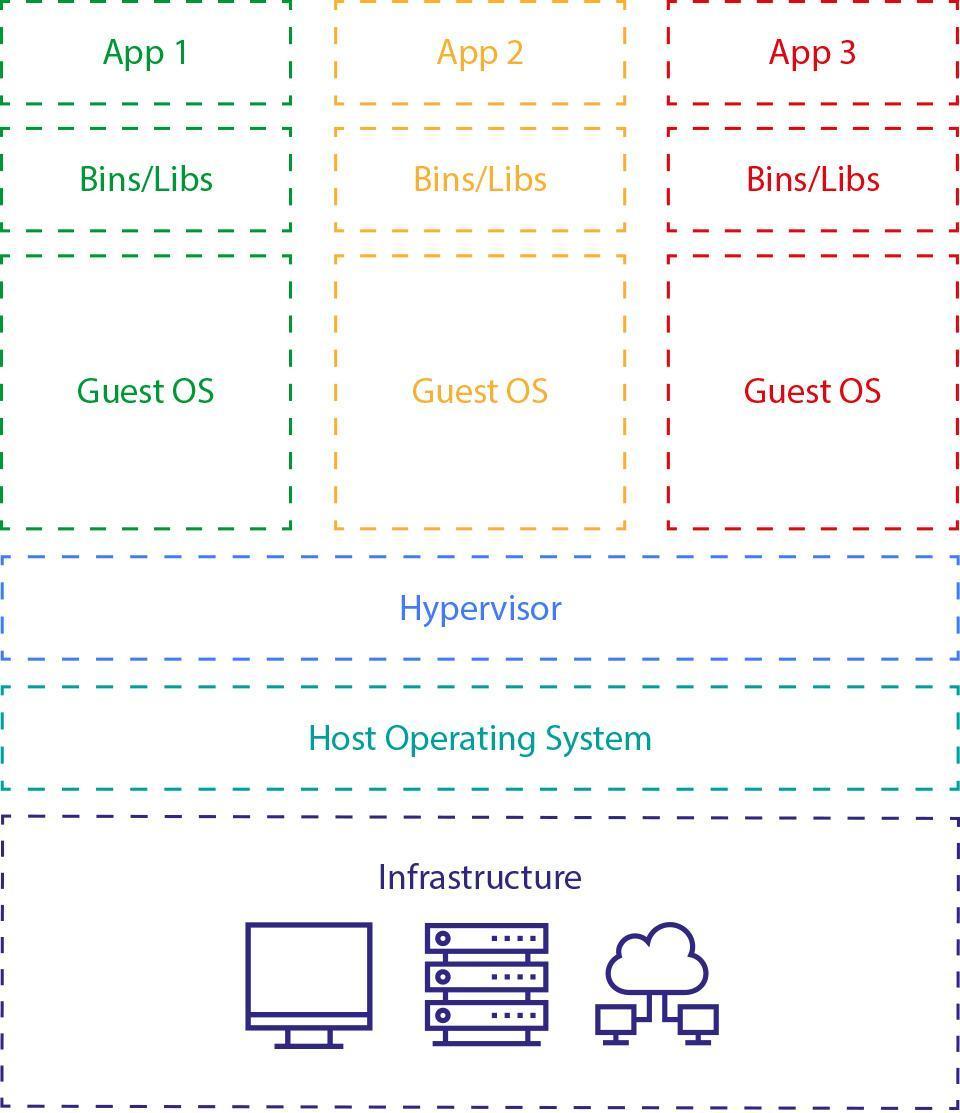
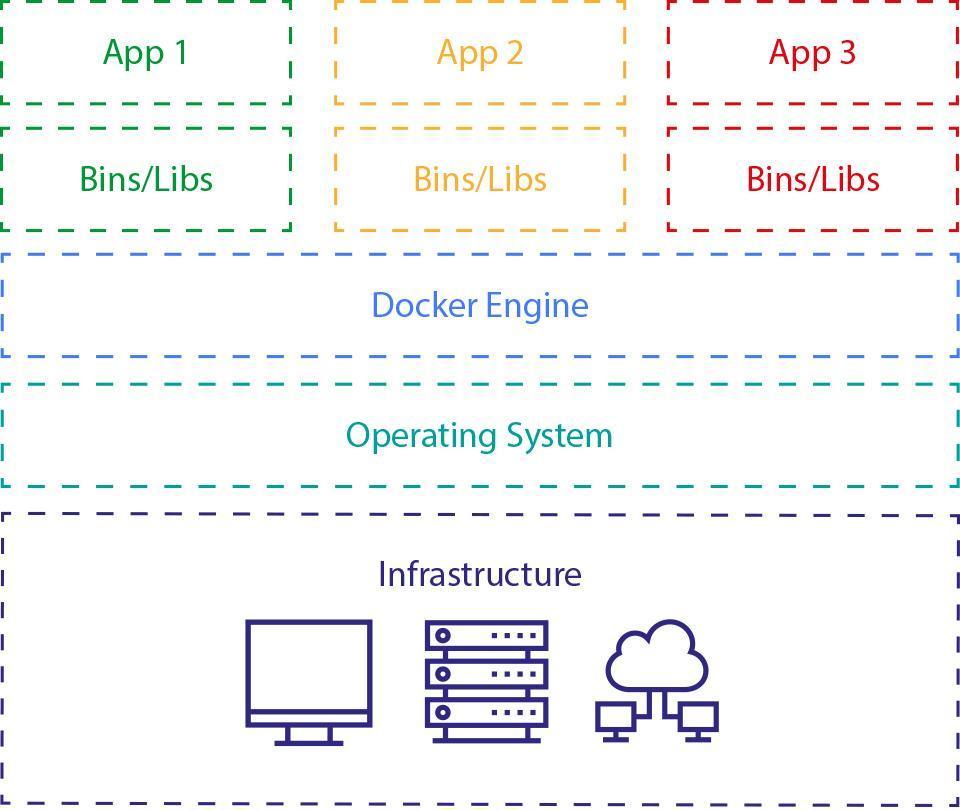
*Fig. 19: *Similar features, different architecture - Virtualization vs, Dockerization. Docker, leverages containerization - lightweight abstraction layer between application and the operating system / hardware. It separates the user processes but without running the whole operating system/kernel inside the container.
# From dev to production
Ok, so we have the technical introduction covered. Now let’s see how Docker helps to build, run and maintain a Microservice oriented application.
# Development
Development is usually the first phase where Docker brings some extra value, and it is even more helpful with Microservice oriented applications. As mentioned earlier, Docker comes with tools that allow us to orchestrate a multi-container setup in a very easy way. Let's take a look at the benefits docker brings during development.
Easy setup - low cost of introducing new developers
You only need to create a Docker configuration once and then each new developer on the team can start the project by executing a single command. No need to configure the environment, just download the project and run docker-compose up. That's all!
This might seem too good to be true but I have a good, real-life example of such a situation. I was responsible for a project where a new front-end developer was hired. The project was written in a very old PHP version (5.3) and had to be run on CentOS. The developer was using Windows and he previously worked on Java projects exclusively. I had a quick call with him and we went through a couple of simple steps: downloading and installing Docker, cloning the git repository and running docker-compose. After no more than 30 minutes he had a perfectly running environment and was ready to write his first lines of code!
No dependencies version mismatch issue
This issue often arises if a developer is involved in multiple projects, but it escalates in Microservice oriented applications. Each service can be written by a different team and using different technologies. In some cases (it happens quite often) there might be a version mismatch with the same technology used in different services. A simple example: one service is using an older elastic version, and another a newer one. This can be dealt with by configuring two separate versions - but it is much easier to run them side-by-side in dedicated containers. A very simple example of such a configuration for docker-compose would look like this:
service_x_elastic:
- image: elasticsearch:5.2.2*
service_y_elastic:
- image: elasticsearch:2.4.4*
Possibility to test if the application scales
Testing if the application scales is pretty easy with Docker. Of course, you won't be able to make some serious load testing on your local machine, but you can test if the application works correctly when a service is scaled horizontally. Horizontal scalability usually fails if the Microservice is not stateless and the state is not shared between instances. Scaling can be very easily achieved using docker-compose:
docker-compose scale service_x=4
After running this command there will be four containers running the same service_x. You can (and you should) also add a separate container with a load balancer like HAProxy in front of them. That's it. You are ready to test!
No more "works on my configuration" issues
Docker is a solution that allows one configuration to be run everywhere. You can have the same - or almost the same - version running on all developer machines, CI, staging, and production. This radically reduces the amount of "works on my configuration" situations. At least it reduces the ones caused by different setups.
Continuous Integration
Now that you have a working development setup, configuring a CI is really easy. You just need to setup your CI to run the same docker-compose up command and then run your tests, etc. No need to write any special configuration; just bring the containers up and run your tests. I've worked with different CI servers like Gitlab CI, Circle CI, Jenkins and the setup was always quick and easy. If some tests fail, it is easy to debug too. Just run the tests locally.
# Pre-production
When you have your development setup up and running, it is also quite easy to push your application to a staging server. In most projects I know, this process was pretty straight-forward and required only a few changes. The main difference is in the so called volumes - files/directories that are shared between your local disk and the disk inside a container. When developing an application, you usually setup containers to share all project files with Docker so you do not need to rebuild the image after each change. On pre-production and production servers, project files should live inside the container/image and should not be mounted on your local disk.
The other common change applies to ports. When using Docker for development, you usually bind your local ports to ports inside the container, i.e. your local 8080 port to port 80 inside the container. This makes it impossible to test scalability of such containers and makes the URI look bad (no one likes ports inside the URI). So when running on any production or pre-production servers you usually put a load balancer in front of the containers.
There are many tools that make running pre-production servers much easier. You should definitely check out projects like Docker Swarm, Kubernetes and Rancher. I really like Rancher as it is easy to setup and really easy to use. We use Rancher as our main staging management tool and all co-workers really enjoy working with it. Just to give you a small insight into how powerful such tools are: all our team members are able to update or create a new staging environment without any issues - and within a few minutes!
# Production
The production configuration should be exactly the same as pre-production. The only small difference might be the tool you use to manage the containers. There are a multitude of popular tools used to run production containers but my two favorites are Amazon EC2 Container Service and Google Cloud with Kubernetes on top. Both tools allow you to scale easily on new hosts
One important thing you should keep in mind when going with Docker on production - monitoring and logging. Both should be centralized and easy to use.
# Cons
Docker has some downsides too. The first one you might notice is that it takes some time to learn how to use Docker. The basics are pretty easy to learn, but it takes time to master some more complicated settings and concepts. The main disadvantage for me is that it runs very slowly on MacOS and Windows. Docker is built around many different concepts from the Linux kernel so it is not able to run directly on MacOS or Windows. It uses a Virtual Machine that runs Linux with Docker.
# Summary
Docker and the Microservice architecture approach work very well together and both concepts gain popularity each year. Over the past 4 years, we have been able to observe how Docker has gotten better and more mature with each release. At the same time, the whole ecosystem has grown and new tools have been published giving us more possibilities that we could not have thought of. By using Docker, we are able to easily run our Microservice oriented applications on our developer machines and then run the same setup on pre- and production servers. Right now we can configure a setup within minutes and then release our application to a server also within minutes. I'm really curious about what new possibilities we will get in the coming months.
# Serverless - Function as a Service
Serverless is not exclusively bound to microservice oriented applications but it is definitely good to know this concept, as it might be helpful in many cases. Let me start with a couple of quotes that might be helpful for you to understand what serverless is about:
Serverless is a new cloud computing trend that changes the way you think about writing and maintaining applications.
Auth0.com
Deploy your applications as independent functions, that respond to events, charge you only when they run, and scale automatically.
serverless.com
*Serverless architectures refer to (..) custom code that's run in ephemeral containers. *
martinfowler.com
As you can see, each of the quotes looks at serverless from a totally different perspective. This does not mean that some of the quotes are better, I think that all describe serverless in a very good way.
Serverless is considered to be a very bad name for what we are talking about. This is for two reasons:
Serverless as a concept has a broader meaning than what it usually refers to; Serverless architecture can be used to describe both Backend as a Service and Function as a Service. Usually, and also in this article, we are interested in the latter: FaaS.
Serverless is a lie. The truth is that servers are still there, Ops are also there. So why is this called „serverless" - it’s called so because you, as a business or as a developer, do not need to think about servers or ops. They are hidden behind an abstraction that makes them invisible to you. Both servers and ops are managed by a vendor like Amazon, Google, Microsoft, etc.
In the context of microservice architecture, FaaS is the concept that is interesting for us.
# Serverless providers
Currently, there are 4 major Clouds that allow us to use serverless architecture.
AWS Lambda - named as the first adopter of FaaS, easily integrates with the rest of Amazon Web Services such as SNS or S3.
Google Cloud Functions - still in beta, allows us to run our functions in Google Cloud. The drawback is, it currently only supports Node.js and JavaScript.
Azure Functions - supports the widest range of languages (JavaScript, C#, F#, Python, PHP, Bash, Batch, and PowerShell) and easily allows us to integrate with Github for storing our code.
IBM Bluemix OpenWhisk - it uses the open-source Apache OpenWhisk project running on top of the IBM Bluemix infrastructure. The most notable feature is that you can use your Docker images to run as functions. A meaningful use-case of IBM OpenWhisk is a DarkVision Application (NOTE: https://github.com/IBM-Bluemix/openwhisk-darkvisionapp ), which shows how that technology can be used with techniques like Visual Recognition, Speech to Text and Natural Language Understanding.
Although it seems that we have a choice, we must keep in mind that commonly, such services are tightly coupled with other services of the particular Cloud, such as databases, message brokers or data storages. Mostly, the wiser choice is just to use the serverless functionality of the Cloud that we already use to run the rest of our microservices.
In the next sections, we’ll use AWS Lambda for all of the examples, but the core concepts remain the same across all of the serverless providers.
# FaaS
In an FaaS approach, developers are writing code - and code only. They do not need to care about the infrastructure, deployment, scalability, etc. The code they write represents a simple and small function of the application. It is run in response to a trigger and can use external services:
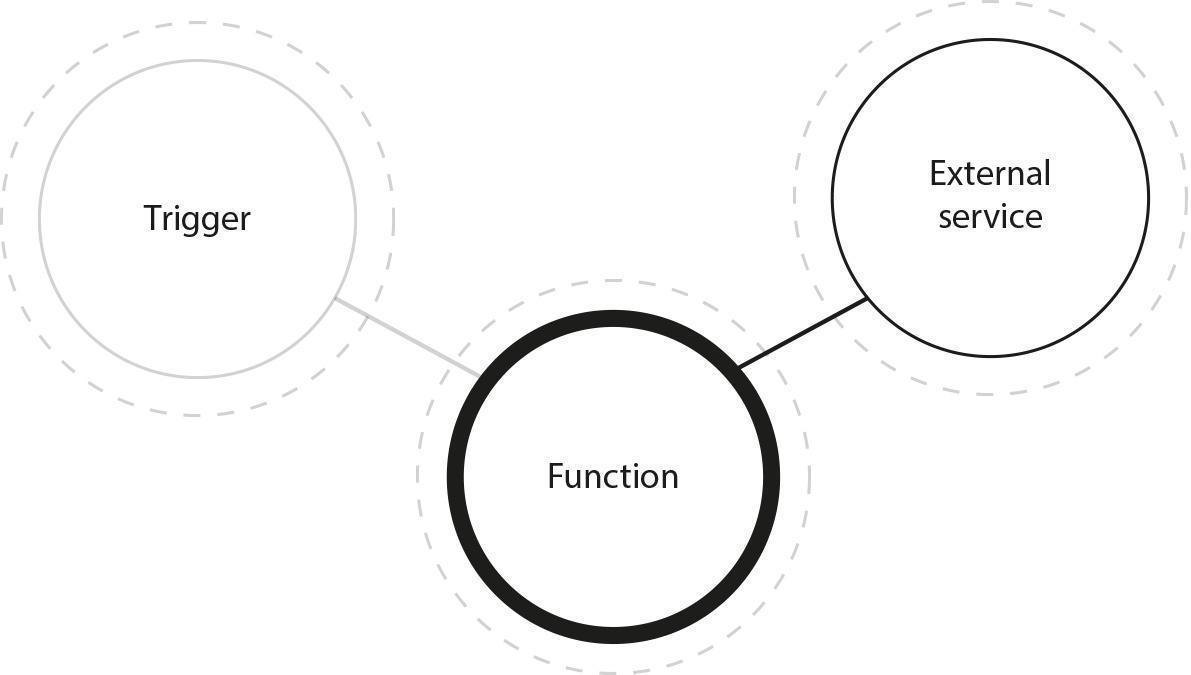
Fig. 20: Basic function as a service architecture consists of only two elements: the function to be run and a trigger to listen for. Usually the function is also connected to third-party services like a database.
A trigger can be almost anything. Based on AWS Lambda, the most popular FaaS service, the trigger might be:
API call (any HTTP request).
S3 bucket upload.
New event in queue.
Scheduled jobs.
Other AWS Lambda functions.
and many others, you can check it here.
Each function should comply with the following rules:
It should not access the disk - AWS allows using a temporary /tmp directory that allows storing 512MB of data.
It should be stateless and share-nothing. You can imagine it as a server powered up and configured to only handle one request (and then destroyed).
Concise - your function should not take too long to run (usually seconds, but up to 300 seconds for AWS Lambda).
Once you have such a function, you just upload it to your service provider and provide some basic configuration. From that moment, on each action configured as a trigger, your function will be executed. The service provider tracks how long it takes for your function to execute, and multiplies the time by the amount of RAM configured (that's a limit you can change). You pay for GB-seconds of execution. This means that if your function is not executed, you do not pay anything and if your function is executed thousands of times during one day, you pay only for the GB-seconds your function took to run. There are no charges for scaling or idle time.
The cost of one GB-second on AWS Lambda is currently $0.00001667 - this means that if your application requires 1024MB of RAM, and runs overall for 1,000,000 seconds (one million seconds), that is 277 hours (over 11 days), you will be charged $16.77; There is also an additional price of $0.20 per 1 million requests. It gets even better if you check out the free tier that Amazon offers. Each month you get 3,200,000 seconds to run a function with a 128MB memory limit for free. That’s over 890h - over 37 days!
I think the calculations above clearly show that you can gain a huge benefit by moving some parts (or all parts) of your application to a FaaS provider. You get the scalability and ops for free, as you do not need to take care of it.
Internally, functions are run in small, ephemeral and stateless containers that are spawn if your application needs to scale up.
You can find an interesting cost comparison to EC2 instances here : https://www.trek10.com/blog/lambda-cost/
# Architecture
I won’t describe the architecture details of a serverless application in this article as it should be quite straightforward when writing a microservice application. The obvious and required step is to move as much presentation and logic to the customer as possible. Usually, your application front-end should be a mobile app or a single-page app.
On the back-end, you can start with a very simple architecture where the function is triggered by an API call and then connects to a DynamoDB instance (or any other on premise data source like MongoDB, MySQL)to fetch/modify some data. Then, you can apply direct read access to some data in your DynamoDB and allow clients to fetch the data directly, but handle all data-modifying requests using your function. You can also introduce Event Sourcing very easily by having one function that records an event and other functions that take the event in order to refresh your read model.
You can also use FaaS to implement batch processing: split the stream of data into smaller chunks and then send them to another function that will run multiple instances of itself simultaneously. This allows you to process the data much faster. FaaS is often used to do real-time log processing.
# It’s easy!
Just a quick „hello world" example to show you how easily you can start writing serverless applications:
exports.handler = (event, context, callback) => {*
    callback(null, 'Hello World');*
};
# Summary
Benefits
FaaS is easy to learn and implement, and it allows you to reduce the time to market. It also allows you to reduce costs, and to scale easily. Each function you write fits easily into a sprint, so it is easy to write serverless applications in agile teams.
Drawbacks
There might be a small vendor lock-in if you do not take this into consideration and do not introduce proper architecture. You should be aware of the communication overhead that is added by splitting the app into such small services. The most common issues mentioned are multitenancy (the same issue as with running containers on Amazon) and cold start - when scaling up, it takes some time to handle the first request by a new container. It might also be a bit harder to test such an application.
# Good use-cases
Here are some use-cases that are interesting in my opinion:
Mostly static pages, including e-commerce; You can host static content on a CDN server or add cache in front of your functions.
Data stream analysis.
Processing uploads - image/video thumbnails, etc.
Actions users pay for. For example, adding watermarks to an ebook.
Other cases when your application is not fully using the server capacity or you need to add scalability without investing much time and money.
# Continuous Deployment
Just imagine that each of your microservices needs to be first built and then deployed manually, not even mentioning running unit tests or any kind of code-style tools. Having tens of those would be extremely time-consuming and would often be a major bottleneck in the whole development process.
Here comes the idea of Continuous Deployment - the thing that puts the workflow of your whole IT department together. In Continuous Deployment we can automate all things related with building Docker containers, running unit and functional tests and even testing performance of newly built services. At the end, if everything passes - nothing prevents us from automatically deploying working solutions into production.
The most commonly used software that handles the whole process is Jenkins, Travis CI, Bamboo or CircleCI. We’ll show you how to do it using Jenkins.
# Designing deployment pipeline
Going from the big picture, a common pipeline could look like this:

Fig. 21: Overview of our final Continuous Deployment pipeline.
Most of the hard work is done by that nice looking guy, called Jenkins. When someone pushes something to our Git repository (e.g. Github), the webhook triggers a *job *inside our Jenkins instance. It can consist of the following steps:
Build Docker image.
Run unit-tests inside the container.
Push image to our images repository (e.g. Docker Hub, Amazon ECR).
Deploy using Ansible or task schedulers like Amazon ECS.
Run functional tests (Selenium)
Run performance tests (JMeter).
After all this, we can set up a Slack notification that will inform us of success or failure of the whole process. The important thing is, that we should keep our Jenkins instance clean, so running all of the unit tests should be done inside a Docker container.
# Coding our pipeline
Once we have the idea of our build process, we can code it using the Jenkinsfile. It’s a file that describes our whole deployment pipeline. It consists of stages and build steps. Mostly, at the end of the pipeline we include post actions that should be fired when the build was successful or failed.
We should keep this file in our application’s code repository - that way developers can also work with it, without asking DevOps for changes in the deployment procedure.
Here is a sample Jenkinsfile built on the basis of the previously mentioned steps. As we can see, the final step is to run another Jenkins job named deploy. Jobs can be tied together to be more reusable - that way we can deploy our application without having to run all of the previous steps.
pipeline {
    agent any
    stages {
        stage('Build Docker') {
            steps {
                sh "docker build ..."
            }
        }
        stage('Push Docker Image') {
            steps {
                sh 'docker push ...'
            }
        }
        stage('Deploy') {
            steps {
                build job: 'deploy'
            }
        }
    }
    post {
        success {
            slackSend color: 'good', message: "Build Success"
        }
        failure {
            slackSend color: 'danger', message: "Build Failed"
        }
    }
}